Restricting Access to Security and Compliance Center Functionalities

About a year ago, we published an article on how to manage preservation policies in the new...

Preservation policies were introduced almost a year ago as part of the Compliance Center in Office 365 (which you might also know as the Protection center, or as Security & Compliance Center after the latest rebranding). In a nutshell, they allow you to preserve content across (almost) all Office 365 workloads. They also provide support for true immutability of the data, such that even the company administrators cannot override.
In this article we will do a short overview of using Preservation policies, focusing on performing the relevant tasks via PowerShell. While the same tasks can be achieved with the use of the Compliance center GUI, going over a list of hundreds or thousands of employees one at a time will hardly be convenient. PowerShell, with its scripting and automation capabilities, will most likely be the tool of choice for any real-world scenarios, at least in large enterprises. Plus, the TechNet documentation on learning about retention policies and retention labels already covers the GUI operations in detail.
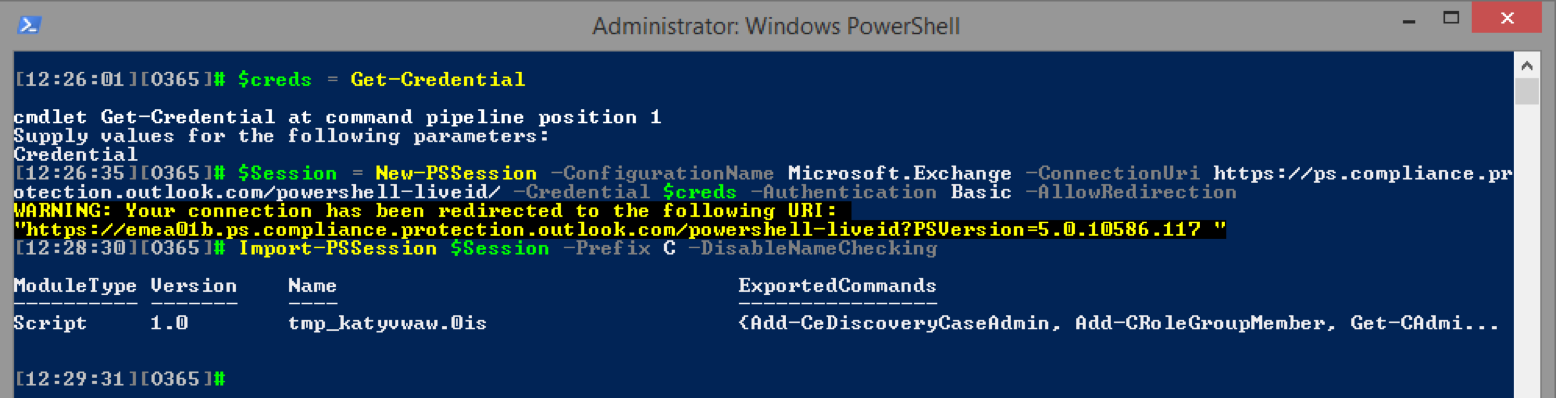
To begin the process, we first need to connect to the Office 365 Compliance Center using remote PowerShell. The process is very similar to creating a remote session to Exchange Online, we simply need to use a different endpoint.

At present, there are 109 cmdlets available with the Compliance center, but as mentioned above, there is substantial overlap with the Exchange Online cmdlets. We will focus only on the Preservation policies, for which all the relevant cmdlets are designated with the Retention prefix. There is a total of 8 of them:
Previously, the cmdlets were designated with the Hold prefix, for example New-HoldCompliancePolicy. Those old versions are still available, but should be deprecated soon.
Before moving on to specific examples, let us select a scenario to examine. Say we have a requirement to preserve the data for our CEO for a duration of 10 years. This should include his personal mailbox, his ODFB files and all the files in a specific SharePoint library, which is limited to the top management in the company only. All data should be included, without the need to filter for specific keywords or date range. Later on, we will modify the policy to cover specific criteria added by our CFO as well.
Our first step is to create a new Preservation policy, and to do so, we will use the New-CRetentionCompliancePolicy (reminder that the “C” prefix was added when importing the cmdlets in order to avoid overlap with the EO cmdlets). The actual cmdlet you need to use is New-RetentionCompliancePolicy). We need to provide a name for the policy and optional description. While the example below uses very generic values for these parameters, in any real-world scenario, properly naming and documenting your policies is a must!
After naming the policy, we need to also provide the list of entities we want to enable preservation for. In our case, this will include the mailbox of the CEO and the URIs of his personal ODFB site and the Management site, thus we need to use the ExchangeLocation and SharePointLocation parameters respectively. Here’s how it will look:

Some remarks are due here. If you do not provide any values for the ExchangeLocation/SharePointLocation parameters, no mailbox/site will be placed on hold. There is no “put all mailboxes on hold” parameter you can use, so each mailbox needs to be listed individually. Or you can specify a Distribution group instead, in which case its membership will be expanded and all current members of the group will be added to the policy. The maximum number of mailboxes you can add in a single preservation policy is 10,000, and you can have up to 1,000 different policies in the tenant.
Unlike the case for mailboxes, if you want to add Public folders it’s an all or nothing approach; the only value that the PublicFolderLocation parameter recognizes is All. A relatively new addition is the option to add Group mailboxes to a preservation policy as well.
On the SharePoint side of things, you can specify up to 1,000 locations, with the policy applying to all subsites within the given site. Listing the SharePoint/ODFB locations is done by providing the full URI for each site and is probably the hardest part of creating a policy, even when using the GUI (there is no picker dialog like we get with Exchange locations). Luckily, with PowerShell you can import a list of locations from a CSV file, then use the CSV to feed the URIs to the New-RetentionCompliancePolicy cmdlet.
Another important note is that neither the WhatIf nor the Confirm switch are functional, which makes testing the cmdlet hard. Even if you try to use said parameters, the end result will be the creation of a new preservation policy, granted the syntax you used for the other parameters is correct. So one should exercise caution when working with the cmdlet. Luckily, there are some safeguards in place. Upon a successful policy creation via the New-CRetentionCompliancePolicy cmdlet, only a placeholder is created. It stores the list of locations, the status of the policy and the Preservation Lock feature, as well as information about the creator. Until a Preservation rule is assigned to the policy, it will be in an invalid state. PowerShell will not alert you about this fact, however, if you look at the newly created policy in the Compliance center, you will notice the following:

You will also note that the policy cannot be edited from the GUI, and your only option there is to delete it. You can however still edit it via PowerShell, and until the policy has been assigned a Preservation rule, you can make any changes necessary, including changing the status of the aforementioned Preservation Lock feature. The feature is controlled via the RestrictiveRetention parameter and defines whether changes to the policy can be made by anyone in the organization. If a policy has been locked, no one (including the company administrators) will be able to turn off or delete the policy. No changes can be made to the removal of any content that is already locked, but adding new locations or extending the duration of the preservation period will still be possible. The Preservation Lock feature is one of the requirements for compliance with the SEC Rule 17a-4 and is the main difference between the Preservation policies and In-Place hold policies.
Before moving to creating a preservation rule, let’s also see how we can modify a policy to add additional content. For example, if we want to add another mailbox, we can do so via the Set-RetentionCompliancePolicy cmdlet and the AddExchangeLocation parameter:

As described in the previous section, creating a preservation policy alone is half the task. To control which content is preserved and for what duration, we need to also create and assign a Preservation rule to the policy, and this is done via the New-RetentionComplianceRule cmdlet. In our scenario, we want to keep all data in the specified locations for a period of 10 years. The cmdlet we need is:

At this point, if we go back and check the Compliance center GUI, we will notice that the error message we saw above has now disappeared. We can double-check if all settings are correctly configured and all desired locations are included, and once we are satisfied with the result, enable the policy.
If changes are necessary, we can modify the Preservation rule via the Set-RetentionComplianceRule cmdlet. For example, suppose we want to readjust the rule so that it includes content for a specific project only. We can set the timeframe via the ContentDateFrom and the ContentDateTo parameters. We also want to limit the effect of the policy to content that includes the keyword Contoso, which is the name of the company we worked with on that specific project, and exclude content with the keyword Fabrikam, the name of the company for a competing project. Here’s how the updated rule will look:

In general, you can use any keyword, property or operator recognized by the KQL syntax. However, if you are creating a preservation policy that includes content across multiple workloads, make sure to only use “generic” properties. If you use a property that is specific for Exchange for example, any result from SharePoint will be excluded. For a list of all properties and advanced KQL resources, you can refer to this article: Using Search Properties and Operators with eDiscovery.
The minimum duration for which you can preserve content, i.e., the minimum value accepted by the PreservationDuration parameter is one day. If you want to preserve content indefinitely, enter the string value Unlimited. If you want to stop the preservation, you can either delete the rule, which will invalidate the policy as explained above, or set the Enabled parameter on the policy to $false. Remember, turning off preservation can cause irreversible data loss!
As a last remark, note that there’s a one-to-one correspondence between a Preservation rule and policy. As noted in the previous section, a policy cannot function without a rule, although if you stick to using the GUI you might not notice the difference between the two. The Policy parameter is mandatory when creating a new preservation rule and once a rule is created you cannot assign it to a different policy. Removing the preservation rule from a policy will automatically release any content, and cause the corresponding policy to become invalid. At this point, your options are to add a new rule or remove the preservation policy.
For the sake of completeness, let’s cover one more scenario, namely, removing any preservation set on a particular mailbox. We already covered some of the details above, but now let’s see the full solution. We start by examining the mailbox properties to check whether any policies apply. As a preservation policy is simply an In-Place hold underneath, we can quickly get the info by looking at the Get-Mailbox output:

As seen from the screenshot above, the InPlaceHolds attribute can be used to check whether the mailbox is under the effect of any preservation policy. Any hold corresponding to a preservation policy will be prefixed with the “UniH” string, which we can strip to get the actual ID of the policy and the corresponding preservation rule.
To remove the hold, we have several options. If we want to release a particular mailbox only, we can run the Set-RetentionCompliancePolicy cmdlet with the RemoveExchangeLocation parameter. If we want to release all content, we can simply run the Set-RetentionCompliancePolicy cmdlet and set the Enabled parameter to $false. Or, we can use the Remove-HoldCompliancePolicy cmdlet instead, as deleting the policy will automatically release all content. Using the Remove-RetentionComplianceRule cmdlet can also work as noted in the previous section. In either case, removing the policy should be accompanied by removing the rule as well. Here’s what it will look like:

With the rule and policy gone, the In-Place hold on the mailbox is also gone. While, in my case, this happened almost instantaneously, the process can take up to 45 minutes in real-word scenarios.
Preservation policies are the latest feature in the Compliance arsenal in Office 365. They work across all workloads and can be configured via the unified compliance console or via PowerShell. While they might feel and look a lot like In-Place holds, there is one very important detail – they allow the concept of Preservation lock, or in other words, an immutable preservation of data that even the administrators cannot override. This might sound like a minor, or even unwanted feature, but it adds a lot of weight to the Office 365 compliance story, and along with the other recent improvements it allowed Microsoft to meet the SEC rule 17A-4 requirements.

About a year ago, we published an article on how to manage preservation policies in the new...