AD FS in Windows Server 2016

With the impending release of Windows Server 2016, we will soon have a new version of AD FS...


Azure Rights Management Service (RMS) is an information protection solution, the cloud-based version of AD RMS. The service has been rapidly evolving in the past few months, introducing features such as: the Tracking portal, which gives users the ability to audit the consumption of their protected content and revoke access if needed; full multi-factor authentication support across all RMS clients; the RMS protection tool, which provides PowerShell cmdlets to bulk (un)protect files and replaces the AD RMS Bulk Protection Tool; the Azure RMS usage logs; and more.
In this article we will focus on the Usage logs, which allow you to audit the consumption of content protected by Azure RMS, as well as perform more detailed analysis as to what devices are used to access content, what IP the content was accessed from and so on. Obtaining and examining the logs is a simple task and only minimal knowledge of the inner workings of RMS is required, however an unfamiliar reader should consider reading the Azure RMS documentation first.
When it comes to auditing usage of Azure RMS, two types of logs can be considered: the Admin audit log, which covers every “privileged” operation such as creating new templates or using the Super user feature, and the Usage logs, which cover the consumption of protected content. We are interested in the latter one.
Several reports that summarize the usage of Azure RMS have been available for a while as part of the Azure AD reports feature, accessible via the (classic) Azure Portal for the Azure AD instance corresponding to your Office 365 tenant. To view said reports one has to login to the Azure management portal, select the Azure AD entry, then click on Reports. The available reports provide data for the number of the protected documents that were accessed for the last one month, the number of users that accessed at least one protected document as well as the number of denied requests, a list of the top 1000 users, list of device platforms from which content was accessed, and a list of applications. While those reports are nice to have, they don’t offer much granularity. In addition, there is no automated way of generating them, as even the Azure AD Reporting API does not expose said reports.
Microsoft is now providing an alternative by introducing the detailed Usage logs we are examining in this article. This feature has been available for a while, but its original version required you to have an Azure subscription and storage account. Since February 2016 the Usage logs feature is free, it’s activated for all Office 365 tenants and all the bits and pieces required are automatically handled by the service. The only thing left for an administrator to do is to download the logs.
In order to download the Usage logs, you need to first install the Azure Rights Management Administration Tool, or in other words the PowerShell module for Azure RMS, or AADRM module. The current version, 2.4.0.0, is available here. For detailed instructions and list of prerequisites, consult the documentation here.
Once the module is installed, one connects to the service via the Connect-AadrmService cmdlet. You need to be a Global Administrator for the Office 365 tenant or have been granted permissions to the AADRM role. Note that the current version of the module does not support Modern authentication, so the account used must not have Multi-factor authentication enabled.
To obtain the logs, you need to use the Get-AadrmUserLog cmdlet. The cmdlet accepts the following parameters:
If you want to download all the available log files, use the following cmdlet:
![]()
It doesn’t make sense to include dates earlier than February 2016 because the feature did not exist prior to that date. If you want the logs for a specific date range, say a month’s worth of data, make sure to include the -ToDate parameter as well. If you are only interested in the logs for specific dates, use this:
![]()
As visible from the above output, in my case, the log file was not downloaded because no events have been registered for the date in question. If events do exist, a single file will be created per date, named in the rmslog-YYYY-MM-DD.log format. The files will be located in the directory specified via the -Path parameter, and any existing files will be overwritten because of the -Force parameter. If you do not specify the -Force parameter, you will have to confirm each overwrite.
Before we move on to the next section, where we will examine the content of the log files, lets quickly discuss the importance of the -Verbose parameter. If you do not specify the parameter, any error messages you might run into will be totally useless to anyone except the good folks at Microsoft that wrote the module. For example, what do you make of this error message:

Quite useful, right? If you do specify the -Verbose parameter, things are a bit clearer:

In this case, the error is due to the fact that I forgot to pre-create the directory in which the log file should be downloaded. Hopefully in future versions of the module some friendlier error messages will be used, until then, however, remember to use the -Verbose parameter every time you run into an error.
Once the logs have been downloaded, one can examine them, feed them to some tool for detailed analysis or simply store them for future use. The logs are using the W3C extended log format (the same format used by IIS), so they can be readily opened via any text editor. An example log is shown on the screenshot below:
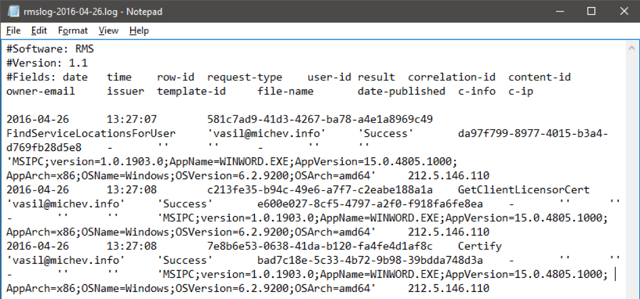
This particular example covers the process of protecting a document, and the relevant actions are listed in the “request-type” column. The client application (Word 2013) first queries the service (“FindServiceLocationsForUser”) for the endpoints on which the Publishing license (PL) exchange is later carried (“GetClientLicensorCert”). The PL is then embedded together with the encrypted document (“Certify”) and the resulting “package” can be securely distributed.
Additional information about the date and time actions were performed is logged, as well as the user who requested the action, the result of the action, the client details, including OS and IP. It is beyond the scope of this article to cover all the different events and other field values gathered in the logs. A detailed list can be found for example in this article. Detailed explanation of the process of bootstrapping the client, protecting and consuming content can be found here.
In a real word scenario, examining the logs with Notepad is probably the last thing you would want to do. Building reports can also prove a challenge because of the separate log files we get per date, so at the very least one might consider combining them into a single file. The documentation linked above includes example on how this can be done via Microsoft’s Log parser, but people familiar with IIS and Exchange logs will probably prefer to use its cousin, Log parser studio. Alternatively, PowerShell can be used:
|
$logfiles = Get-ChildItem "D:\Logs\ADRMS" -Filter rmslog*.log $logfiles | % { Get-Content $_.FullName | select -Skip 2 | % {$_ -replace "#Fields: ",""} | ConvertFrom-Csv -Delimiter `t | Export-Csv -nti "D:\Logs\ADRMS\AllLogs.csv" -Append } |
Whichever method you use, the idea is the same — to combine all the logs in a single CSV file, so that you can easily work with it in Excel or other tools. In the following example, the combined CSV file is opened in Excel and filtered to show all events concerning a specific file and timeframe:
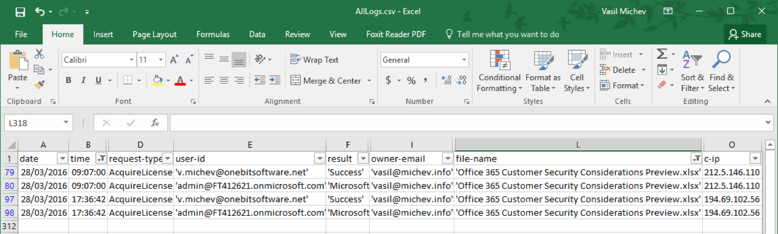
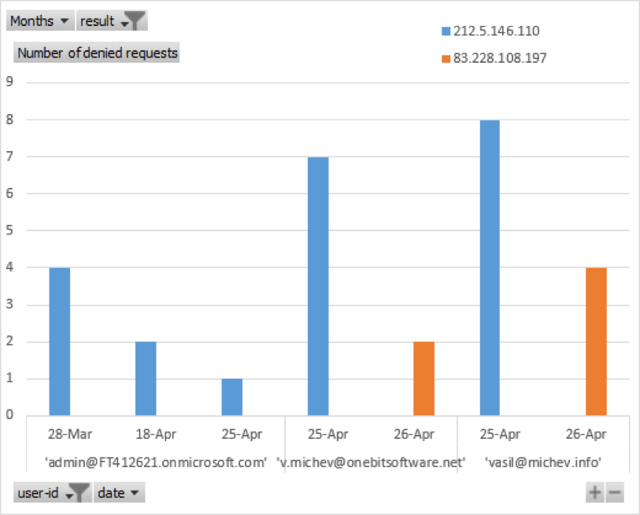
In other words, the picture above shows the usage logs for “consumption” of particular protected documents. Of course, there’s much more one can do with the complete data set. For example, it takes a few clicks in Excel to create a “Number of denied requests” report, similar to the one available in the Azure portal. Moreover, we can easily visualize it as a Pivot Chart, make it filterable and insert additional information such as the IP address of the offending client. An example is shown below:
While speaking about the Azure RMS usage logs, one cannot avoid mentioning a related feature – the Azure RMS notifications, and in general, the Azure RMS Tracking portal. The email notifications feature sends an email to the owner of a protected document each time an attempt is made to open it, the best part being that those notifications are almost instantaneous. Combined with the option to instantly revoke access to the document, this feature provides a “must have” package for anyone concerned about data leakage.
Unfortunately, the notification feature and the option to instantly revoke access to a document are only available with the Azure RMS Premium subscription, which can either be purchased as a standalone product or as part of EMS. Another unfortunate fact is that both features are not automatically available and need to be configured for each document at the time it is protected, by means of using the relevant options of the Rights Management Sharing app.
If your organization does have the Azure RMS Premium subscription, there’s yet another very cool feature you can take advantage of. The Document tracking portal allows each user to get a very detailed overview of all documents he has protected via Azure RMS, the people they are shared with, and who has (tried to) access the document. Basically, all the information we can obtain via the Usage logs is presented in a nice, browser-based UI, accessible from anywhere. For example, this is the “Map” view for the usage details of the same document we looked at in the previous pictures:
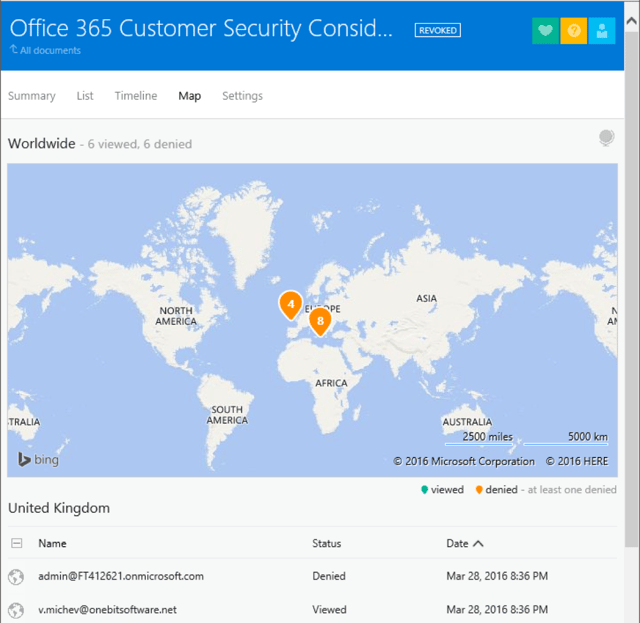
The portal also allows you do download detailed usage reports and use the “revoke” feature. For additional details on the process of protecting documents via the RMS Sharing app check this article, while this article will give you more information on tracking and revoking documents.
In this article I attempted to introduce you to the Azure RMS Usage logs, which enables you to monitor the adoption of RMS in your organization, as well as to respond to security incidents. The feature is available for free and is enabled for each Office 365 tenant, so there is no reason not to take advantage of it.
Of course, auditing does not equal prevention, even though the Azure RMS Usage logs are updated in a matter of minutes. Instead, features such as the near real-time email notifications for the consumption of content protected via the RMS Sharing app and the option to instantly revoke access to a document should be considered for scenarios where securing access to sensitive documents is required.


Active Directory Rights Management Services (AD RMS) is an on-premises information rights...